

Before you create a schedule
- You must have the Admin role.
- You must have at least one valid recipient email address.
- The Invoice Report card is available only when your broker account has invoices.
- Set your Display Timezone in Account Settings before you select a schedule time.
Create a scheduled report
1
Open the schedule form
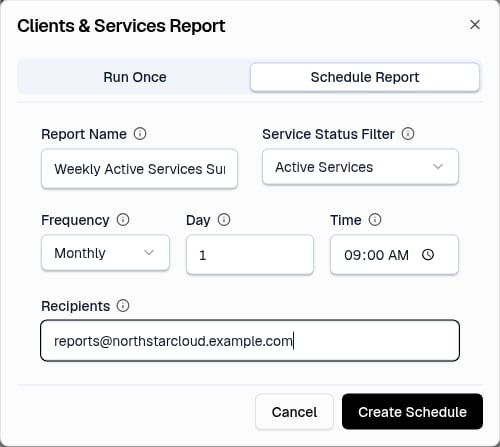
Select Reports in the Analytics section of the sidebar, find the report in Available Reports, select Schedule on its card, and confirm that Schedule Report is selected.
2
Configure the report
Enter a Report Name and select the report option.
3
Set the recurrence
Select Daily, Weekly, or Monthly in Frequency, then enter Time. A weekly schedule shows Day with Sunday through Saturday, a monthly schedule takes a day from 1 through 31, and a daily schedule does not show Day.
4
Add recipients and save
Enter comma-separated email addresses in Recipients, then select Create Schedule.
Timezone and recurrence behavior
The Time field uses your current display timezone, and the panel converts this value to UTC when it saves the schedule. Your saved Display Timezone applies; otherwise the broker default timezone applies. The Schedule, Last Run, and Next Run columns also use your current display timezone, and the Schedule column shows a timezone abbreviation. The panel calculates Next Run when it creates a schedule, and recalculates it when you change the frequency, day, or time.Recipients and delivery
You can add up to 10 recipient email addresses, and the panel removes duplicate addresses without regard to letter case. It sends each successful scheduled report as an email attachment: an.xls file for the Services Report and a PDF file for the Invoice Report.
Manage schedules

- Run Now: available for both report types. Review the Run Report Now confirmation and select Run Now. A successful manual run emails the report to all recipients and updates Last Run, but does not change Next Run.
- Edit: change the fields in Schedule Report and select Update Schedule. The panel recalculates Next Run only when you change the frequency, day, or time.
- Delete: review the Delete Scheduled Report confirmation and select Delete. Deletion is permanent; select Cancel to keep the schedule.