> ## Documentation Index
> Fetch the complete documentation index at: https://broker-docs.newyorkcityservers.com/llms.txt
> Use this file to discover all available pages before exploring further.
# Form Center
> Create, publish, and manage VPS service request forms.
The **Form Center** creates public forms for VPS service requests. A client can open a direct link or use an embedded form. Each valid submission creates a request in **Requests**.
## Access And Roles
Signed-in broker Admin and Staff users can open **Form Center**. Both roles can view forms, copy form links, open forms, get embed code, and view submissions.
Only an Admin can make these changes:
* Create or edit a form.
* Activate or deactivate a form.
* Delete a form.
* Save **Trusted IPs**.
* Save **Manage Embed Domains** settings.
## Open Form Center
1. Open **Form Center** under **Integrations** in the sidebar.
## Forms List
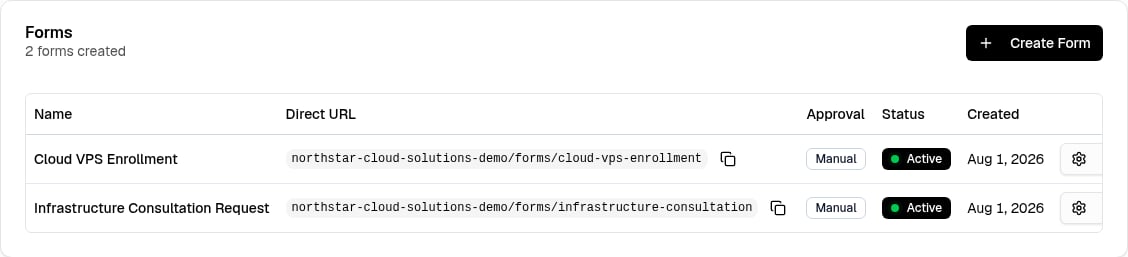 Each row shows the form name, **Direct URL**, **Approval** (**Manual** or **Automatic**), **Status** (**Active** or **Inactive**), creation date, and the **Manage** menu. The **Manage** menu contains the sharing actions (**Copy Form URL**, **Get Embed Code**, **Open Form**), **View Submissions** (opens **Requests** filtered to the form), and the status, edit, and delete controls.
The public URL controls are not available when the broker account does not have a slug. Contact support if the page shows **Broker slug not set. Please contact support.**
## Create A Form
You must have the Admin role.
1. Select **Create Form**.
2. Complete the current step.
3. Select **Next**.
4. Repeat until you reach **Notifications**.
5. Select **Create Form**.
The builder has these steps:
| Step | Purpose |
| ----------------- | ------------------------------------------------------ |
| **Setup** | Set the form name, description, and approval behavior. |
| **Design** | Configure fields and appearance. |
| **Success Page** | Set the result after a successful submission. |
| **Translations** | Add localized form content. |
| **Notifications** | Add extra notification email addresses. |
| **Complete** | Copy the direct link or embed code. |
Select **Previous** to return to an earlier step. Select a completed step in the step list to return to that step. Select **Cancel** to close the builder without saving.
### Setup
Enter a unique value in **Form Name**. The panel uses this name to identify the form. It also creates the form path from the name for a new form.
**Description (Optional)** helps your team identify the purpose of the form. The description also appears on the public form.
Select one value in **Approval Settings**:
| Setting | Behavior |
| ------------------- | ---------------------------------------------------------------------------------------------- |
| **Manual Approval** | The submission stays pending until a broker user approves it. This is the recommended setting. |
| **Auto Approval** | The panel starts VPS provisioning immediately after submission. |
Use an **Auto Approval** form internally only. Do not publish it for public
use. A valid submission starts VPS provisioning without a broker review.
### Service And Plan Settings
The form always includes these required service fields:
* **Requested Plan** selects the VPS plan for the request.
* **VPS Language** selects the VPS language for the request.
To limit the plans that a client can select:
1. Open the **Design** step.
2. Select **Fields**.
3. Open the edit menu for **Requested Plan**.
4. Select **Edit**.
5. Change the selections in **Visible Plan Options**.
At least one plan option must remain selected. Select **Save Changes** to keep the field changes.
### Fields
Each row shows the form name, **Direct URL**, **Approval** (**Manual** or **Automatic**), **Status** (**Active** or **Inactive**), creation date, and the **Manage** menu. The **Manage** menu contains the sharing actions (**Copy Form URL**, **Get Embed Code**, **Open Form**), **View Submissions** (opens **Requests** filtered to the form), and the status, edit, and delete controls.
The public URL controls are not available when the broker account does not have a slug. Contact support if the page shows **Broker slug not set. Please contact support.**
## Create A Form
You must have the Admin role.
1. Select **Create Form**.
2. Complete the current step.
3. Select **Next**.
4. Repeat until you reach **Notifications**.
5. Select **Create Form**.
The builder has these steps:
| Step | Purpose |
| ----------------- | ------------------------------------------------------ |
| **Setup** | Set the form name, description, and approval behavior. |
| **Design** | Configure fields and appearance. |
| **Success Page** | Set the result after a successful submission. |
| **Translations** | Add localized form content. |
| **Notifications** | Add extra notification email addresses. |
| **Complete** | Copy the direct link or embed code. |
Select **Previous** to return to an earlier step. Select a completed step in the step list to return to that step. Select **Cancel** to close the builder without saving.
### Setup
Enter a unique value in **Form Name**. The panel uses this name to identify the form. It also creates the form path from the name for a new form.
**Description (Optional)** helps your team identify the purpose of the form. The description also appears on the public form.
Select one value in **Approval Settings**:
| Setting | Behavior |
| ------------------- | ---------------------------------------------------------------------------------------------- |
| **Manual Approval** | The submission stays pending until a broker user approves it. This is the recommended setting. |
| **Auto Approval** | The panel starts VPS provisioning immediately after submission. |
Use an **Auto Approval** form internally only. Do not publish it for public
use. A valid submission starts VPS provisioning without a broker review.
### Service And Plan Settings
The form always includes these required service fields:
* **Requested Plan** selects the VPS plan for the request.
* **VPS Language** selects the VPS language for the request.
To limit the plans that a client can select:
1. Open the **Design** step.
2. Select **Fields**.
3. Open the edit menu for **Requested Plan**.
4. Select **Edit**.
5. Change the selections in **Visible Plan Options**.
At least one plan option must remain selected. Select **Save Changes** to keep the field changes.
### Fields
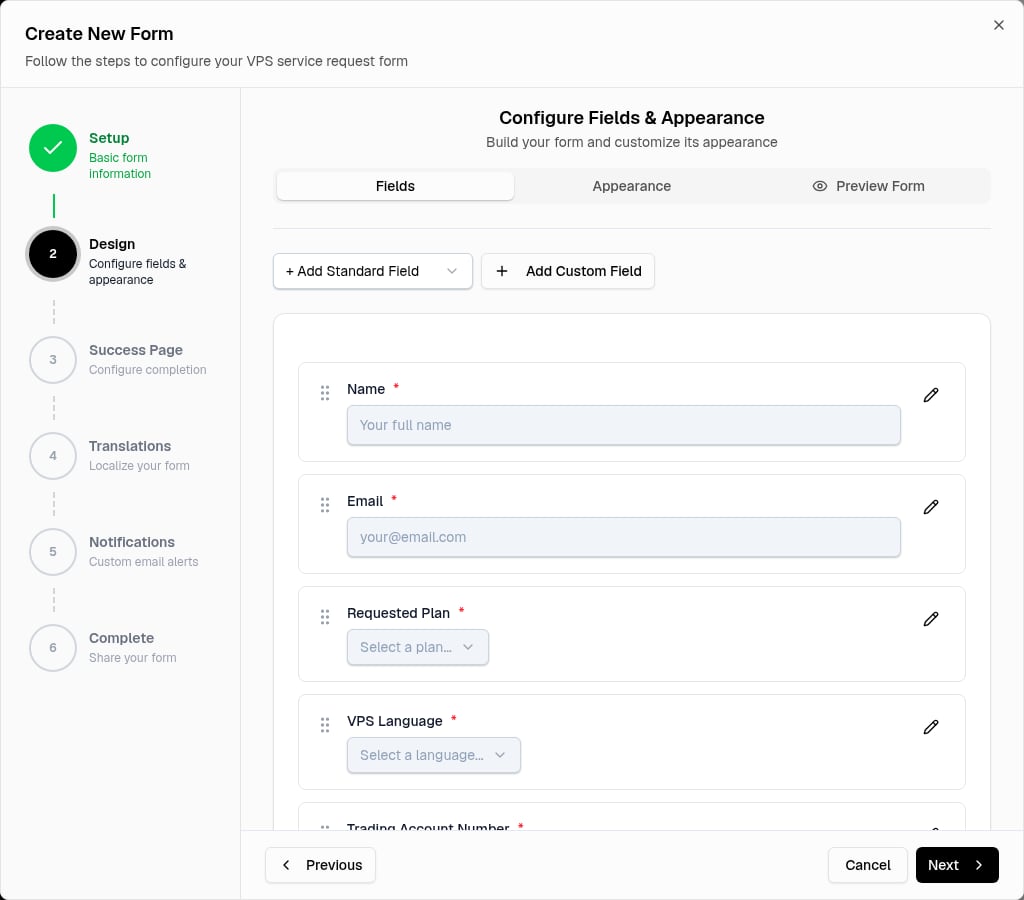 A new form contains these required standard fields. You cannot remove them:
* **Name**
* **Email**
* **Requested Plan**
* **VPS Language**
* **Terms and Conditions**
A new form also contains **Trading Account Number**. You can remove this optional field. Use **+ Add Standard Field** to add an optional **Phone**, **Trading Account Number**, or **Additional Notes** field that is not on the form.
Use the drag handle to change the field order. Open a standard field's edit menu to change **Label**, **Placeholder**, or **Help Text**.
For **Terms and Conditions**, set **Content Type** to **External Link** or **Inline Content (Markdown)**. An external link uses **Terms and Conditions URL**. Inline content uses **Terms and Conditions Content**.
To add a custom field:
1. Select **Add Custom Field**.
2. Select a value in **Field Type**.
3. Enter a value in **Label**.
4. Complete the other field settings.
5. Select **Save Changes**.
**Field Type** has **Text**, **Textarea**, **Number**, **Select Dropdown**, **Radio Buttons**, **Checkboxes**, **Date**, and **URL**. A select, radio, or checkbox field must have at least one value in **Options (one per line)**. Select **Required field** when the client must complete the field.
A form must have at least one field. Each custom field must have a label.
### Appearance
A new form contains these required standard fields. You cannot remove them:
* **Name**
* **Email**
* **Requested Plan**
* **VPS Language**
* **Terms and Conditions**
A new form also contains **Trading Account Number**. You can remove this optional field. Use **+ Add Standard Field** to add an optional **Phone**, **Trading Account Number**, or **Additional Notes** field that is not on the form.
Use the drag handle to change the field order. Open a standard field's edit menu to change **Label**, **Placeholder**, or **Help Text**.
For **Terms and Conditions**, set **Content Type** to **External Link** or **Inline Content (Markdown)**. An external link uses **Terms and Conditions URL**. Inline content uses **Terms and Conditions Content**.
To add a custom field:
1. Select **Add Custom Field**.
2. Select a value in **Field Type**.
3. Enter a value in **Label**.
4. Complete the other field settings.
5. Select **Save Changes**.
**Field Type** has **Text**, **Textarea**, **Number**, **Select Dropdown**, **Radio Buttons**, **Checkboxes**, **Date**, and **URL**. A select, radio, or checkbox field must have at least one value in **Options (one per line)**. Select **Required field** when the client must complete the field.
A form must have at least one field. Each custom field must have a label.
### Appearance
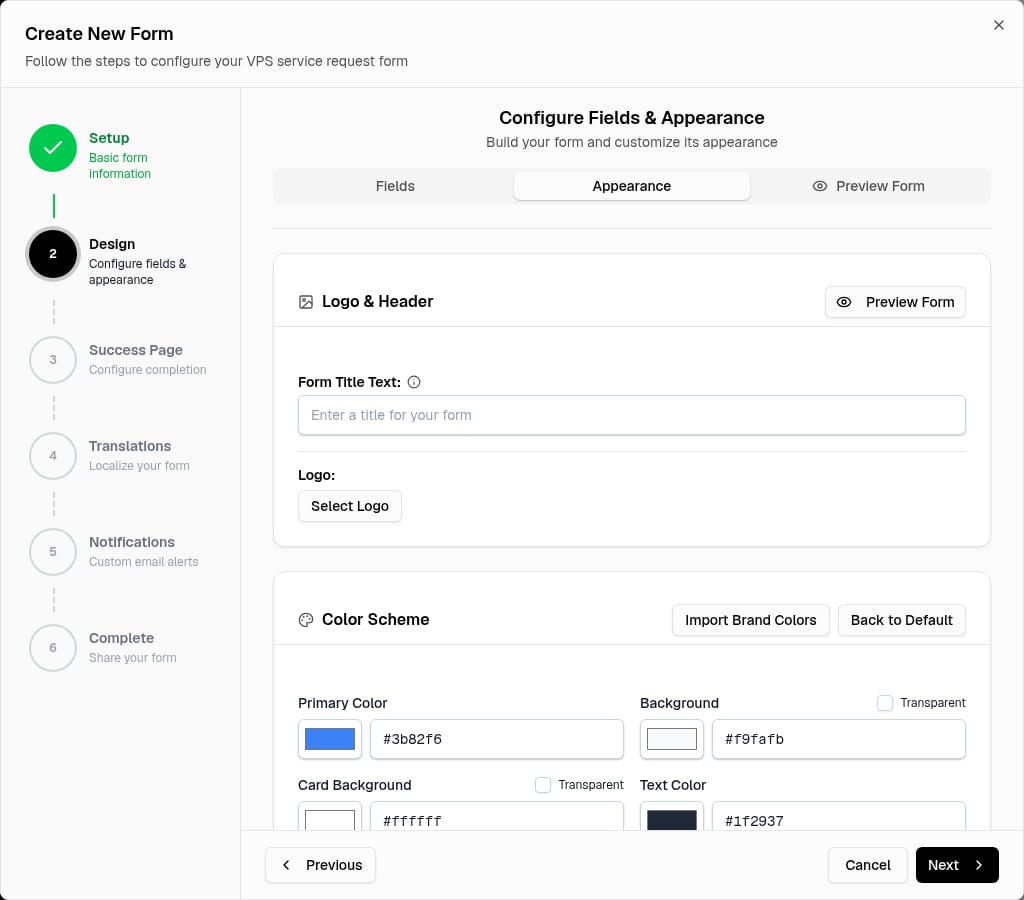 Select **Appearance** in the **Design** step. Use **Preview Form** to open a preview while you work.
**Logo & Header** controls the public form title and logo. **Form Title Text** can be empty. An empty value hides the title. **Select Logo** opens the broker brand assets. When a logo is selected, you can set **Logo Position**, **Width (px)**, and **Height (px)**.
**Color Scheme** controls **Primary Color**, **Background**, **Card Background**, **Text Color**, and **Accent Color**. **Background** and **Card Background** can be transparent. **Import Brand Colors** copies the saved broker brand colors. **Back to Default** restores the default form colors.
**Form Customization** has these groups:
* **Theme Preset** has **Compact**, **Default**, and **Spacious**.
* **Typography** controls the font family and text sizes.
* **Spacing** controls **Form Padding (px)** and **Field Gap (px)**.
* **Layout** controls **Width**, **Border Radius**, and **Shadow**.
### Success Page
**Success Page Settings** controls what happens after a successful submission.
* **Success Message** displays a confirmation on the form.
* **Redirect URL (Optional)** sends the client to that URL instead of the success message.
The redirect URL must use HTTP or HTTPS.
### Translations
The **Translations** step adds localized public form content. Each added language has its own form title, description, success message, and active field text.
To add a translation:
1. Select a language in **Add Language**.
2. Select **Add Translation**.
3. Review the generated translation.
4. Change the translated text when necessary.
Use **Form Auto Translated** to generate the content again. Use **Remove** to delete a translation. A translated form uses the selected locale in its direct link or embed code.
### Notifications
Staff members who enabled pending request notifications receive notifications for manual form submissions. Use **Additional Email Addresses (Optional)** to add other recipients.
1. Enter an email address.
2. Select **Add**.
Use the delete control in **Current Email Addresses** to remove an extra recipient. The panel does not let you add an address that is already a staff notification address or is already in this list.
## Complete And Publish A Form
A new form is **Active** after the Admin selects **Create Form**. The **Complete** step shows the **Direct Link** and **Embed Code** sharing controls. See [Publish and Embed Forms](/broker/integrations/form-embedding) for sharing, embedding, and slug requirements.
## Edit A Form
You must have the Admin role.
1. Find the form in **Forms**.
2. Select **Manage**.
3. Select **Edit Form**.
4. Change the required settings.
5. Select **Update Form** in **Notifications**.
The builder closes after a successful update. The saved changes apply to the public form.
## Activate Or Deactivate A Form
An Admin can change a form's status from its **Manage** menu. An **Active** form accepts public submissions; an **Inactive** form does not. See [Publish and Embed Forms](/broker/integrations/form-embedding) for activation and publishing details.
## Delete A Form
You must have the Admin role. The delete action cannot be undone.
1. Find the form in **Forms**.
2. Select **Manage**.
3. Select **Delete Form**.
4. Review the **Delete Form** message.
5. Select **Delete**.
If the form has submissions, the confirmation shows the submission count. Deleting the form does not delete its submissions. The requests remain in request history.
## Form Settings
**Form Settings** contains broker-wide **Trusted IPs** and **Manage Embed Domains** controls. Only an Admin can change these settings. See [Publish and Embed Forms](/broker/integrations/form-embedding) for setup, rate-limit, and security details.
## Resulting Requests
Each valid form submission creates a **New Service** request with the **Form** source. The form's approval setting controls whether the request stays pending for review or starts automatic approval. See [Publish and Embed Forms](/broker/integrations/form-embedding) for submission-review details.
Select **Appearance** in the **Design** step. Use **Preview Form** to open a preview while you work.
**Logo & Header** controls the public form title and logo. **Form Title Text** can be empty. An empty value hides the title. **Select Logo** opens the broker brand assets. When a logo is selected, you can set **Logo Position**, **Width (px)**, and **Height (px)**.
**Color Scheme** controls **Primary Color**, **Background**, **Card Background**, **Text Color**, and **Accent Color**. **Background** and **Card Background** can be transparent. **Import Brand Colors** copies the saved broker brand colors. **Back to Default** restores the default form colors.
**Form Customization** has these groups:
* **Theme Preset** has **Compact**, **Default**, and **Spacious**.
* **Typography** controls the font family and text sizes.
* **Spacing** controls **Form Padding (px)** and **Field Gap (px)**.
* **Layout** controls **Width**, **Border Radius**, and **Shadow**.
### Success Page
**Success Page Settings** controls what happens after a successful submission.
* **Success Message** displays a confirmation on the form.
* **Redirect URL (Optional)** sends the client to that URL instead of the success message.
The redirect URL must use HTTP or HTTPS.
### Translations
The **Translations** step adds localized public form content. Each added language has its own form title, description, success message, and active field text.
To add a translation:
1. Select a language in **Add Language**.
2. Select **Add Translation**.
3. Review the generated translation.
4. Change the translated text when necessary.
Use **Form Auto Translated** to generate the content again. Use **Remove** to delete a translation. A translated form uses the selected locale in its direct link or embed code.
### Notifications
Staff members who enabled pending request notifications receive notifications for manual form submissions. Use **Additional Email Addresses (Optional)** to add other recipients.
1. Enter an email address.
2. Select **Add**.
Use the delete control in **Current Email Addresses** to remove an extra recipient. The panel does not let you add an address that is already a staff notification address or is already in this list.
## Complete And Publish A Form
A new form is **Active** after the Admin selects **Create Form**. The **Complete** step shows the **Direct Link** and **Embed Code** sharing controls. See [Publish and Embed Forms](/broker/integrations/form-embedding) for sharing, embedding, and slug requirements.
## Edit A Form
You must have the Admin role.
1. Find the form in **Forms**.
2. Select **Manage**.
3. Select **Edit Form**.
4. Change the required settings.
5. Select **Update Form** in **Notifications**.
The builder closes after a successful update. The saved changes apply to the public form.
## Activate Or Deactivate A Form
An Admin can change a form's status from its **Manage** menu. An **Active** form accepts public submissions; an **Inactive** form does not. See [Publish and Embed Forms](/broker/integrations/form-embedding) for activation and publishing details.
## Delete A Form
You must have the Admin role. The delete action cannot be undone.
1. Find the form in **Forms**.
2. Select **Manage**.
3. Select **Delete Form**.
4. Review the **Delete Form** message.
5. Select **Delete**.
If the form has submissions, the confirmation shows the submission count. Deleting the form does not delete its submissions. The requests remain in request history.
## Form Settings
**Form Settings** contains broker-wide **Trusted IPs** and **Manage Embed Domains** controls. Only an Admin can change these settings. See [Publish and Embed Forms](/broker/integrations/form-embedding) for setup, rate-limit, and security details.
## Resulting Requests
Each valid form submission creates a **New Service** request with the **Form** source. The form's approval setting controls whether the request stays pending for review or starts automatic approval. See [Publish and Embed Forms](/broker/integrations/form-embedding) for submission-review details.